Last weekend I worked on a problem statement to conduct a simulation of sudden price change on the AAVE v3 liquidity protocol and see how it affects the users in the market.
This blog will take you through the project, understand some important concepts about blockchain core and defi, and then show how you can create your own simulation scenarios in a blockchain state.
First, let’s understand some jargon. (I am not marketing anyone here).
What is AAVE?
You can find in the AAVE docsthat it is a decentralized non-custodial liquidity protocol where users can participate as suppliers or borrowers.
Decentralized — No single authority controlling the protocol
Non-custodial — Users have complete control of their assets. The protocol cannot take over the control of the user’s assets unless approved by the user in some cases
liquidity — money on hand 🤑
AAVE allows users to deposit their ERC20 tokens in a pool market reserve. For example, if some users have a lot of USDC token, they can supply them to AAVE, creating a lending pool reserve of USDC.
This reserve is used by the borrowers to borrow tokens like USDC by providing a collateral to the protocol.
By this, the suppliers can get a passive income and borrowers get the liquidity they need. This is a great thing for users because you can have liquidity in another asset token without selling the assets you own, just by keeping it as collateral.
If you got the concept, great! If not let me explain it in Elon Musk terms:
Elon Musk POV
Elon Musk owns 20.5% stakes in Tesla (source Google). He has 411 million shares of Tesla, having a worth of $120 Billion. These shares are his assets, not hard cash. Its money on paper. As the value of Tesla grows, so will the value of its asset.
Now he wants some cash in hand to spend. Like to buy a house or groceries, etc. He will require USD $. For this, there are 2 ways to get USD.
Sell some Tesla shares to the buyers in exchange for USD.
Give the Tesla shares to a bank as collateral and take a loan from the bank in USD.
Using the 2nd option, you get liquidity by keeping your asset as collateral. This is beneficial as you don’t have to sell your assets to get liquidity.
Something similar we do in AAVE, I have many WETH tokens, but I have to do a transaction in WBTC. I can supply my WETH tokens to the AAVE protocol and borrow WBTC tokens keeping those supplied WETH as collateral.
Simulation Problem Statement
Now keeping the above scenario in mind. After we borrowed WBTC, what if the worth of the tokens suddenly dropped by 50% 📉?
How will this change affect the users?
Thats what we are going to simulate here.
AAVE denotes the supplied amount and borrowed amount in a base currency like USD.
Requirements
We will do this simulation on Ethereum Mainnet by interacting with AAVE smart contracts on Mainnet. Now to do transactions on a smart contract on Ethereum mainnet, you will require some ETH in your wallet.
Instead of this, we will use Hardhat to fork the Mainnet and use the default accounts in Hardhat which have 10000 ETH pre-funded in them.
The steps we followed —
configure the blockchain fork
get the required smart contracts from AAVE protocol on Mainnet
get actual price of WBTC from AAVE sources
get users who have borrowed WBTC from the pool lending reserve
check user debt and health factor before 50% price drop
check user health factor after 50% price drop and if they can be liquidated
There will be more explanation about jargons.
Creating a Mainnet Fork
Start by creating a new hardhat project.
This tutorial uses Hardhat, but you can use standalone Ganache, Foundry or something else as you like.
npm install --save-dev hardhat && npx hardhat init
Update your hardhat.config.ts file like this
import { HardhatUserConfig, vars } from "hardhat/config";
import "@nomicfoundation/hardhat-toolbox";

const config: HardhatUserConfig = {
  solidity: "0.8.24",
  networks: {
    hardhat: {
      forking: {
        enabled: true,
        url: vars.get('ALCHEMY_RPC_MAINNET'),
        blockNumber: <Block number of your choice, most recent recommended>,
      },
      gas: 2100000,
      chainId: 1,
    }
  }
};

export default config;
You can name the network as anything, here it is named as hardhat. Refer to the docs for more information on forking networks. The vars.get(ALCHEMY_RPC_MAINNET) requires an RPC url that you can get from the Alchemy website after creating a new project.
vars in hardhat allows us to access the environment variables.
Coding the Simulation
Create a new script in the scripts directory of your hardhat project. Let’s call it simulation.ts . Create an async function called runSimulation and add the following code with the necessary imports
import { ethers } from "hardhat";

const POOL_ADDRESS_PROVIDER_ADDRESS = "0x2f39d218133AFaB8F2B819B1066c7E434Ad94E9e";

const runSimulation = async () => {
    try {
        const [signer] = await ethers.getSigners();
        console.log("Current block number ", await signer.provider.getBlockNumber());
        const network = await signer.provider.getNetwork();
        console.log(`Current network chainId = ${network.chainId}`);
.
.
.

    } catch (error) {
        console.error("error ", error);
    }
}
The line getSigners() function from ethers returns a list of default account which are pre-funded with 10000 ETH. By default the first account is taken up for use by the array destructuring [signer].
We are going to use many smart contracts from AAVE. For that we require their addresses and ABIs. AAVE provides a contract address provider. It means that this particular contract has the latest addresses of all other contracts that are required by our simulation.
The contract 0x2f39d218133AFaB8F2B819B1066c7E434Ad94E9e on mainnet, called as poolAddressProvider will be used to fetch addresses of other contracts. You can find the contract methods and ABI here.
const runSimulation = async () => {
    try {
.
.
.

        const poolAddressProviderContract = new ethers.Contract(POOL_ADDRESS_PROVIDER_ADDRESS, poolAddressProviderAbi, signer);

        const poolAddress = await poolAddressProviderContract.getPool();
        const admin = await poolAddressProviderContract.getACLAdmin();
        const aclManagerAddress = await poolAddressProviderContract.getACLManager();
        const oracleAddress = await poolAddressProviderContract.getPriceOracle();
        const poolDataProviderAddress = await poolAddressProviderContract.getPoolDataProvider();
        console.table({
            'Pool': poolAddress,
            'DEFAULT_ADMIN_ROLE': admin,
            'ACLManager': aclManagerAddress,
            'PriceOracle': oracleAddress,
            'PoolDataProvider': poolDataProviderAddress,
            'UiPoolDataProviderV3Address': uiPoolDataProviderV3Address
        });
.
.
.

    } catch (error) {
        console.error("error ", error);
    }
}
The output we get from this is

Addresses of AAVE contracts and entities to be used in the simulation
You can find the ABIs of all of the contracts that will be used in this github directory. Here is what the above contracts will do.
Pool — Used for getting the user account data. It contains the user health factor, total collateral, total user debt etc.
DEFAULT_ADMIN_ROLE — This is not a smart contract, but a EOA address. This is the admin required to do changes in the contract values that only the admin has permission to do.
ACLManager — Access Control List manager contract will be used to check for proper permissions
PriceOracle — This is the contract which gives us the actual price of an asset token. We can use this to get the price of WBTC in the market. Later we will have to drop it by 50%.
Next we initialize these contracts in the runSimulation function
const WBTC_ADDRESS = "0x2260FAC5E5542a773Aa44fBCfeDf7C193bc2C599"; // on mainnet

const runSimulation = async () => {
    try {
.
.
.
        const poolContract = new ethers.Contract(poolAddress, poolAbi, signer);
        const poolDataProviderContract = new ethers.Contract(poolDataProviderAddress, poolDataProviderAbi, signer);

        const oracleContract = new ethers.Contract(oracleAddress, aaveOracleAbi, signer);
        const aclManagerContract = new ethers.Contract(aclManagerAddress, aclManagerAbi, signer);

        const currentWBTCPrice = await oracleContract.getAssetPrice(WBTC_ADDRESS);
        console.log("WBTC price in USD = ", currentWBTCPrice);

        const WBTCPriceSource: string = await oracleContract.getSourceOfAsset(WBTC_ADDRESS);
        console.log("Price source ", WBTCPriceSource);
.
.
.

    } catch (error) {
        console.error("error ", error);
    }
}
Using the oracleContract you can check the actual price of WBTC and also check the source from where the oracle is fetching the price for AAVE protocol.
This is important because we cannot just do currentWBTCPrice/2 in the code and run the simulation. To simulate a 50% price drop in the AAVE we will have to do something that will make the WBTCPriceSource contract tell that WBTC is now at 50% of the actual price to the entire AAVE protocol. We will have to do the modifications in the asset price source contract.
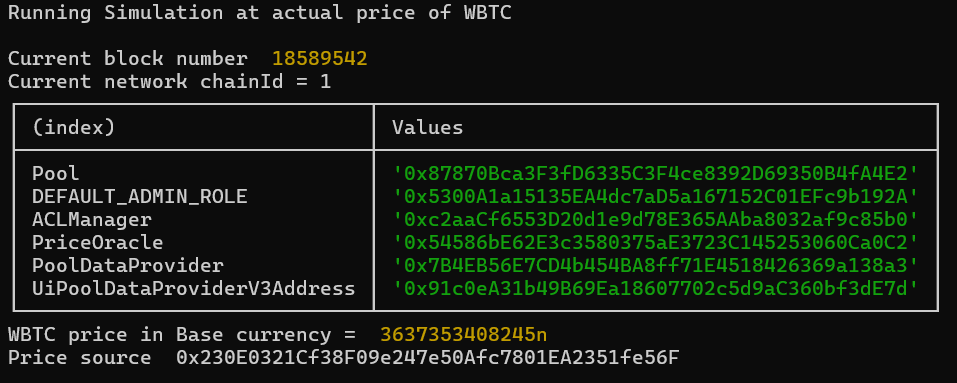
WBTC actual price and the price source contract from where oracle gives the price of asset
Simulate 50% drop in WBTC value
To simulate a 50% drop in WBTC, we will have to do some updates in the source from where the actual price of WBTC is returned. Basically, the idea is that after this, the source should return the value actual_price_of_WBTC/2 when asked for the price of WBTC.
We can create a new contract which will extend the Price source contract and implement the same method being used by the parent contract that fetches the asset price. Just this method will override the behavior of the parent source contract and return half of the actual price as the return value to the protocol.
To create this new contract, go to your contracts directory of hardhat project and create a new smart contract file. Name it WBTCFeedOverride.sol .
If you check the price source contract on Etherscan you will find the interfaces it uses. We will now add that contract as a parent contract that is extended by WBTCFeedOverride contract.
Here is the code of that new contract
// SPDX-License-Identifier: MIT
pragma solidity ^0.8.4;

interface ICLSynchronicityPriceAdapter {
  /**
   * @notice Calculates the current answer based on the aggregators.
   */
  function latestAnswer() external view returns (int256);

  error DecimalsAboveLimit();
  error DecimalsNotEqual();
}

interface ICLSynchronicityPriceAdapterPegToBase is ICLSynchronicityPriceAdapter {}

contract WBTCFeedOverride is ICLSynchronicityPriceAdapter {
    ICLSynchronicityPriceAdapterPegToBase public ASSET_PRICE_CONTRACT;

    constructor(address sourceAddress) {
        ASSET_PRICE_CONTRACT = ICLSynchronicityPriceAdapterPegToBase(sourceAddress);
    }

    function latestAnswer() public view virtual override returns(int256) {
        return ASSET_PRICE_CONTRACT.latestAnswer()/2;
    }
}
The contract has a constructor which takes an argument of the source contract address that we got from the AAVE Oracle contract. The latestAnswer() is the view function that returns the actual price of the asset in the parent contract, which now will be halved.
After deploying this and calling the function oracleContract.getAssetPrice(WBTC_ADDRESS); you will get half of the actual WBTC value.
Come back to your script and create a new function to deploy this contract in the forked mainnet.
const deployNewPriceFeedContract = async (
    WBTCPriceSource: string,
    admin: string,
    aclManagerContract: any,
    signer: any,
    oracleAddress: string) => {
    const newPriceFeedFactory = await ethers.getContractFactory("WBTCFeedOverride");
    const newPriceFeedContract = await newPriceFeedFactory.deploy(WBTCPriceSource);
    const newPriceFeedContractAddress = await newPriceFeedContract.getAddress();

    console.log("New pricefeed contract deployed at ", newPriceFeedContractAddress);

.
.
.
}
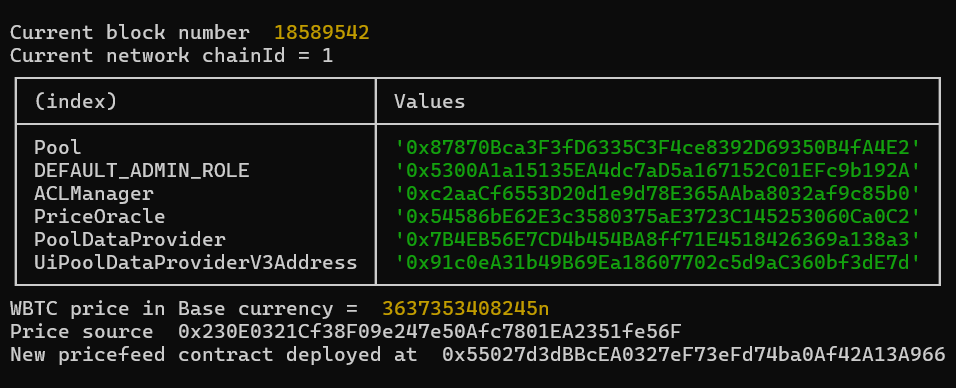
New price feed contract to get WBTC at 50% of its value deployed
But there is one more step before AAVE protocol accepts this change, that is to change the protocol price feed source in oracle contract.
Changing Price Feed Source
In the above picture you can see that the current price feed source used by the AAVE protocol is 0x230E0321Cf38F09e247e50Afc7801EA2351fe56F . This source currently gives the actual price of WBTC.
We have to replace this source by our new price feed contract which is deployed with the address 0x55027d3dBBcEA0327eF73eFd74ba0Af42A13A966 .
This can be done using the setAssetSources() function of the Oracle Contract. But this function contains a restriction that only the admin with correct permissions can call it.
In the above code, we extracted the address of the Default Admin Role. This address is also the pool admin and has sufficient permissions to call setAssetSources() method.
To call that function on behalf of the admin, we will have to impersonate that account in hardhat. Hardhat allows you to impersonate an account without requiring its private key. Note that by doing so the only change in state will be in the forked network and not in the actual mainnet.
Here is the code for how to do that.
import { impersonateAccount, stopImpersonatingAccount } from "@nomicfoundation/hardhat-network-helpers";

const deployNewPriceFeedContract = async (
    WBTCPriceSource: string,
    admin: string,
    aclManagerContract: any,
    signer: any,
    oracleAddress: string) => {
.
.
.
    const hasAccess = await aclManagerContract.isPoolAdmin(admin);
    if (hasAccess === true) {
        await impersonateAccount(admin);
        const adminSigner = await ethers.getSigner(admin);
        const fundAdmin = await signer.sendTransaction({
            to: adminSigner.address,
            value: ethers.parseEther("5")
        });
        await fundAdmin.wait();
        const adminOracleContract = new ethers.Contract(oracleAddress, aaveOracleAbi, adminSigner);
        const newPriceSourceTxn = await adminOracleContract.setAssetSources(
            [WBTC_ADDRESS],
            [newPriceFeedContractAddress]
        );
        await newPriceSourceTxn.wait();
        await stopImpersonatingAccount(admin);
}
First, we check if the admin is actually the pool admin. If that's true, then we impersonate the admin account by using the method await impersonateAccount(admin) and get a signer object for it.
Initially the ETH balance of this admin is going to be 0. So, we will have to fund some ETH tokens to it for allowing it to pay for gas fees of the transaction.
Using signer.sendTransaction we can fund this admin account with 5 eth. You can add any number below 10000 eth. Next step is to connect the admin signer with the oracle contract and send a transaction which will change the price feed source to our new deployed contract.
The setAssetSources takes 2 arguments, an array of asset addresses and an array of their price source. The lengths of both of the arrays should be equal.
After successful transaction the AAVE protocol will use our new deployed price feed contract for fetching the price of WBTC, which returns its value after dropping it by 50%.
You can notice the difference between WBTC price before and after deploying the new price feed contract. Its value is reduced by 50%.
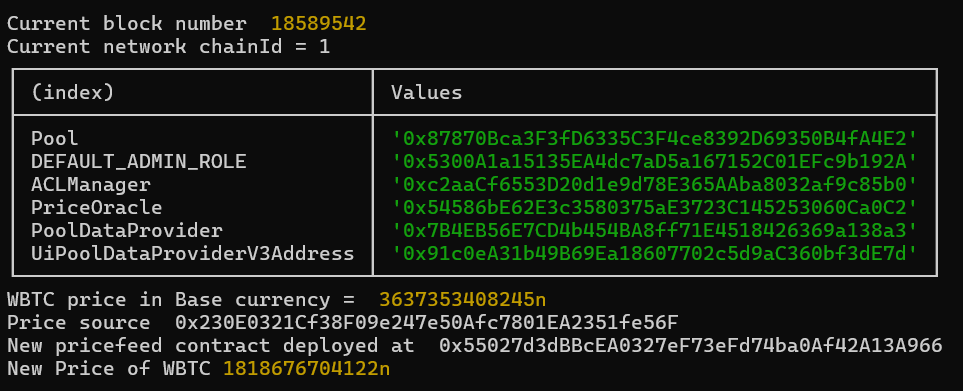
Screenshot of getting new price of WBTC by dropping it by 50% in AAVE protocol
Getting Users that borrowed WBTC
To get the users that borrowed WBTC, we will use the graph queries. In this project directory you can find the custom written graph queries to find the users who owe debt in WBTC reserve. Using axios we can execute them. This is how the function will look like for fetching users that have borrowed from WBTC reserve.
import axios from "axios";
import { borrowQuery } from "./graph-query/borrow";
import { reserveQuery } from "./graph-query/reserve";

const AAVE_SUBGRAPH_URL = 'https://api.thegraph.com/subgraphs/name/aave/protocol-v3';

const getUsers = async (poolContract: any) => {
    const res = await axios.post(AAVE_SUBGRAPH_URL, {
        query: reserveQuery(),
        variables: { underlyingAssetAddress: WBTC_ADDRESS }
    });
    console.log("Reserve id = ", res.data.data.reserves[0].id);
    const reserveId: string = res.data.data.reserves[0].id;

    const res2 = await axios.post(AAVE_SUBGRAPH_URL, {
        query: borrowQuery(),
        variables: {
            reserveId: reserveId,
            blockNumber: 18589542
        }
    });
    const borrowLogs = res2.data.data.userReserves;
.
.
.
}
The borrowLogs contains the addresses of users in debt.
Next we have to check the health factor of each user in debt. To do this we use the function getUserAccountData() from the poolContract which gives use information about the users health. You can check the poolContract docs on AAVE to see what does the function return.
The rest of the getUsers will look like
const AAVE_SUBGRAPH_URL = 'https://api.thegraph.com/subgraphs/name/aave/protocol-v3';

const getUsers = async (poolContract: any) => {
.
.
.
    let userAccounts: any = {};

    for (let log of borrowLogs) {
        const user = log.user.id;
        const userAccountData = await poolContract.getUserAccountData(user);
        const healthFactor = userAccountData.healthFactor;
        userAccounts[user] = {
            healthFactor: healthFactor.toString(),
            totalCollateralBase: userAccountData.totalCollateralBase.toString(),
            totalDebtBase: userAccountData.totalDebtBase.toString(),
            liquidation: healthFactor < 1e18 ? true : false
        }
    }
    console.table(userAccounts);
    return userAccounts;
}
Running the simulation
You can use the command to run the script for executing the simulation.
npx hardhat run scripts/simulation.ts
This is the output you will see running the simulation at actual WBTC price and after 50% drop.
- Actual WBTC price
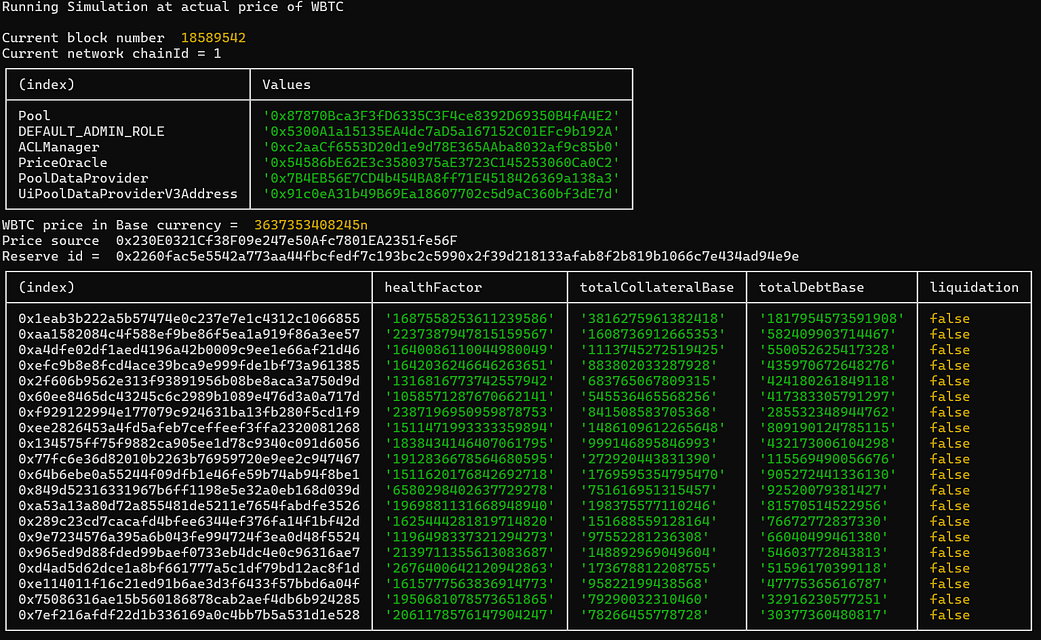
Simulation output at the actual price of WBTC
2. After 50% drop in actual WBTC price
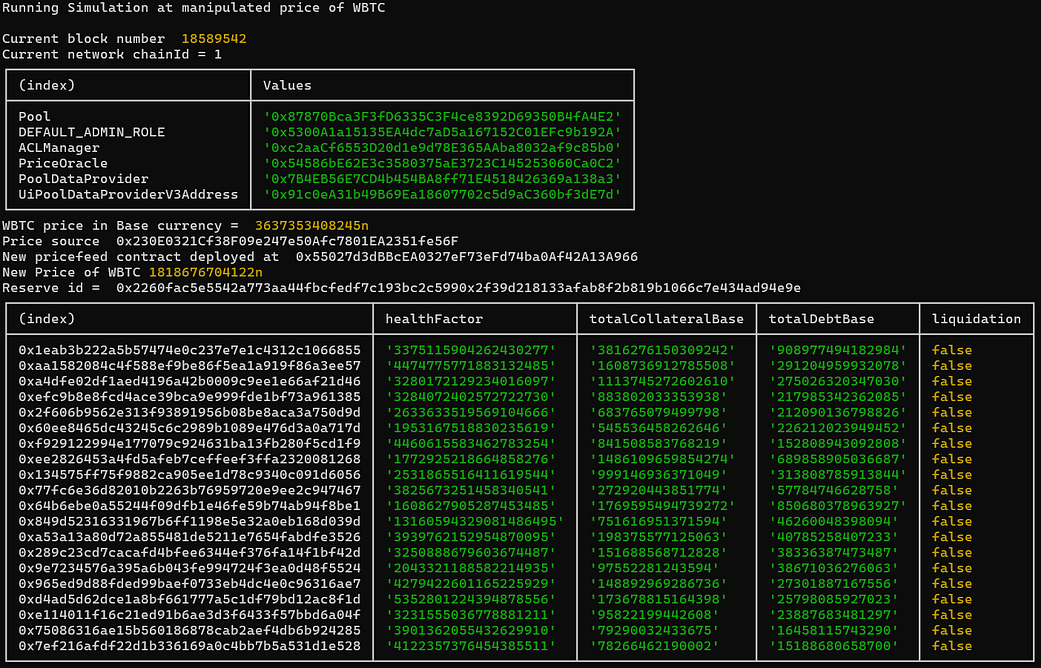
Simulation output after 50% price drop in WBTC
Notice the change in totalDebtBase column of the 2 simulations. You will see that the total debt of the users after 50% price drop is reduced. Also you will see that the health factorof each user and totalCollateralBase of users have also changed.
If the health factor of a user goes below 1, that is less than 1e18 then that account becomes eligible to be liquidated by users. Currently we don’t see that happening, but you can play with the price and see what happens.
Conclusion
You can find the entire project repo on this GitHub link. Fork the main branch and execute the code after setting the Alchemy RPC url in the environment variables.
Thank you for reading here. More such tutorials and blogs on core blockchain will be upcoming.
